In this article, you will find all the details of the steps to learn how to make a unicorn cake with rainbow layers, even if you are new to making decorated cakes.
How to make this rainbow unicorn cake?
In summary, the cake is covered in white frosting, with colored frosting swirls on top and along one side to feature the mane, ears and horn in golden fondant, and eyes made in black frosting.

Does this cake take a long time to bake?
Difficult to answer this question. This will of course depend on your mastery of the pastry bag and your overall pastry skills. Even if you are not a pastry bag pro, by taking each step methodically, you should be able to bake the unicorn cake without going completely crazy!
This of course requires a lot of patience, and good hand-eye coordination. But if you love to bake and have fun decorating cakes, even as a beginner, you can easily make this unicorn cake again. It should be relatively #instagrammable.
And think that it will cost you much less than having it made in a pastry shop!

Making the rainbow floors of the unicorn cake
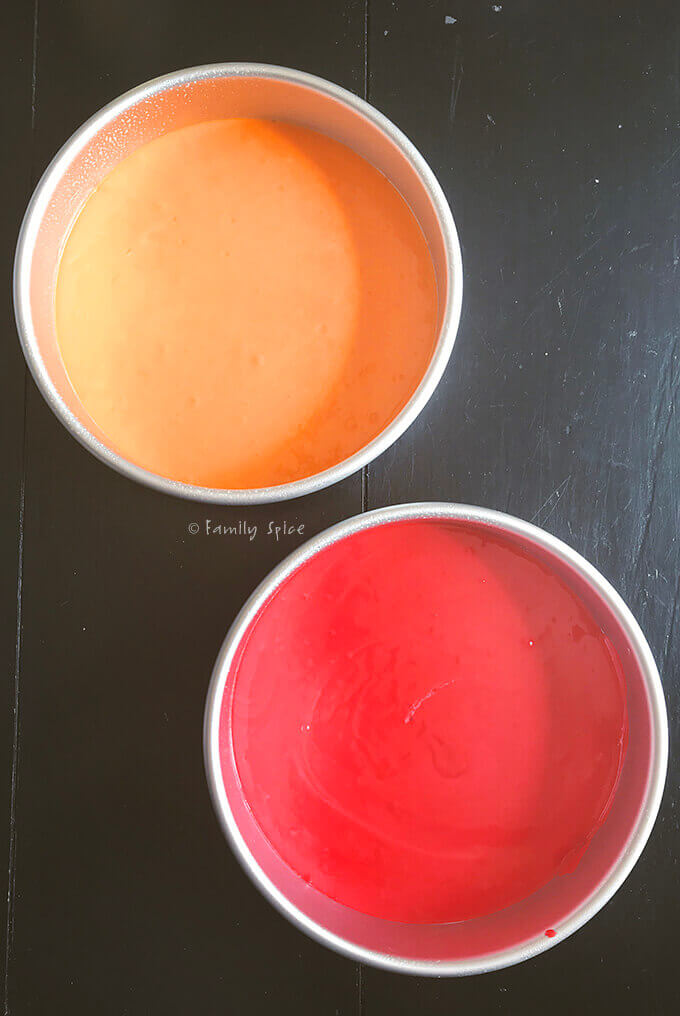
The inside of the cake is made of 6 layers of cake in the colors of the rainbow: red, orange, yellow, green, blue and purple. After all, unicorns are so associated with rainbows.
Here we have used two ready-made yogurt cake mixes, to better focus on the decorating part.
Discover our rpasta / cookies for cakes.
In order to obtain 6 equivalent layers, just divide each preparation into 3.
To do this, place your empty cul-de-poule on a kitchen scale, then tare. Pour or bake the cake mix in the cul-de-poule, look at the weight obtained and divide it into 3. As easy as that! Pour 2/3 of the preparation into 2 other different bowls (so you will have three times 1/3 of the preparation in 3 different bowls).


Once you have obtained the 3 bowls of dough, you can add the chosen food coloring to them. Then cook the 3 colored pasta according to the instructions on the package in 3 20-inch molds lined with parchment paper. During this time, clean your 3 bowls and repeat the previous steps (preparation, division, coloring and baking) with the second package of cake mix.
For this unicorn cake project, you can prepare the cake layers the night before you are going to decorate them. Then, you can do the decoration on the morning of the event.
Only the horn and the ears by melting were made the day before because they need time to dry and harden. More details on this in the next section.
How to make a unicorn horn by melting
?Once again, to simplify the creation of the not-so-simple-to-make unicorn cake, you can use store-bought fondant here for the horn and the ears. It's not that difficult to make your own fondant but it does take time.
You will need about 500g of fondant for both ears and the horn.

For the horn, take a golf ball-sized ball of fondant, powdered sugar to keep the items from getting sticky, and a bamboo skewer.
To roll the fondant, use a silicone mat or sprinkle a work surface with powdered sugar.
Roll the ball of fondant into a thin sausage about 50cm long. To do this, roll your ball of fondant between your two hands to obtain a beautiful sausage. Then roll it onto your countertop with both hands, stretching the ends as you roll.
Put more pressure on one end as you roll the sausage so that you get a tapered shape. This step takes a little practice. Do not hesitate to start over from the ball step if you are not satisfied with the result.
Do not hesitate to put your children to contribution for this step. With their extensive experience with plasticine, don't be surprised if they do better than you.
Once you have a fine pudding of fondant that you are satisfied with, you can make the horn by wrapping it carefully around a bamboo skewer.
Starting from the thinner end of your sausage while melting, wrap it around the end of the skewer. Then continue to wrap it down along the peak.

You choose the size of the horn. Here the horn is about 22-25cm long. Once the desired length is obtained, cut off the excess fondant and tuck the end of the fondant rod into the horn. This part of the horn will not be visible because it will be hidden under the icing decorations.
Poke your horn in a safe place to dry it. It can be a foam block or just a glass or a vase. The horn will then be decorated with golden edible paint.
How to make unicorn ears using fondant?
The ears are much easier to make than the horn.
Use teardrop cookie cutters if you have them, otherwise you can use the pattern below.
You will need a ball of fondant about the size of a tennis ball. Spread the fondant on your countertop, on your silicone mat or with a sprinkle of sugar to prevent it from sticking. Roll out until you get a thickness of about 3mm thick. Cut out 2 large ears and 2 smaller ones.

Lightly moisten the back of one of the small ears and place on one of the large ears. The bottoms of both ears should be aligned. Do not squeeze the fondant too hard so as not to crack it. Gently squeeze them together.

Do the same with the two remaining ear pieces.
We will now curl the ears. Take the assembled ears and place them lengthwise on a small rolling pin or the handle of a whisk, small ear facing down. Gently press along the curve to curve the small and large ears together.
Place the roller with both ears in a sheltered place and let dry for at least 1 hour or even overnight.

Once the ears have hardened, you can remove them from the roller or whisk and they will keep their curved shape. They will then be ready to be painted gold.
Paint the unicorn horn and ears gold
Once the ears and horn have hardened, it's time for the golden phase!
You can find the golden edible powder at baking stores or Amazon. You won't need a lot of it, so even if it's a small amount, it should be enough.
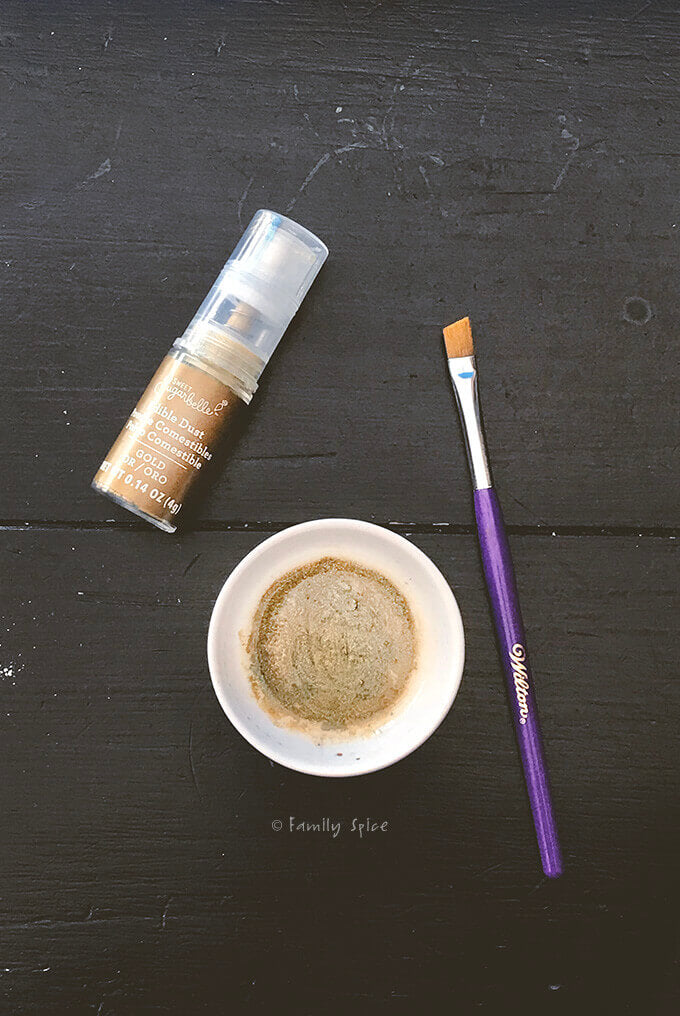
Mix a teaspoon in a small bowl with a few drops of vodka, peppermint or almond extract. The alcohol will evaporate as the paint dries, leaving the golden paint well adhered to the fondant.
Use a new paintbrush for this step. Any brush will do as long as it has never been used before.
Simply paint the horn and the ears (here the entire horn and the small inner ears) with gold edible paint and let dry for about 2 hours or overnight.
If you want, you can also roll up small tabs for the eyes and lashes and paint them gold as well.
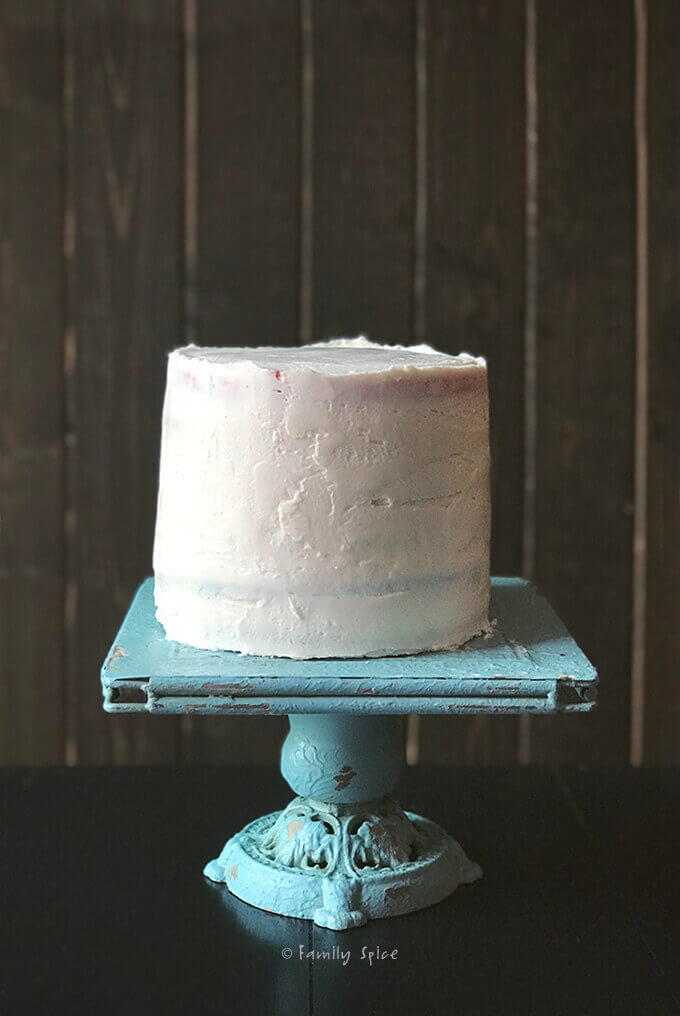
Frost the rainbow cake
The six rainbow tiers of the unicorn cake are covered in white frosting. You can use store-bought icing or make it yourself. Here is an example of a recipe. Also discover our article on icing.
You will need about 6 to 6 1/2 cups of white frosting to simply fit the layers together and cover the outside of the cake. We used homemade buttercream here instead of frosting. To choose, it is better to use a good homemade buttercream rather than store-bought icing. Took over 6 cups of buttercream to make the mane. Better to plan more than to risk running out.

Once the cake is well covered with icing / buttercream, nice and clean, let it rest in the refrigerator for 1 or 2 hours. Take the opportunity during this time to do some dishes and color the rest of the icing / buttercream for it. rest of the decoration.
Dressing the mane on the unicorn cake
Here we have used 4 different colors for the mane: pink, purple, periwinkle gray and light blue, distributed as follows:
- 2 cups of pale pink buttercream, in a shower bag with tips # 824 and # 4B
- 1 cup light blue buttercream, in a shower bag with nozzle # 2A
- 2 cups of purple buttercream, in a shower bag with nozzle # 824
- 1 cup of periwinkle gray buttercream, in a shower bag with tips # 2A and # 4B
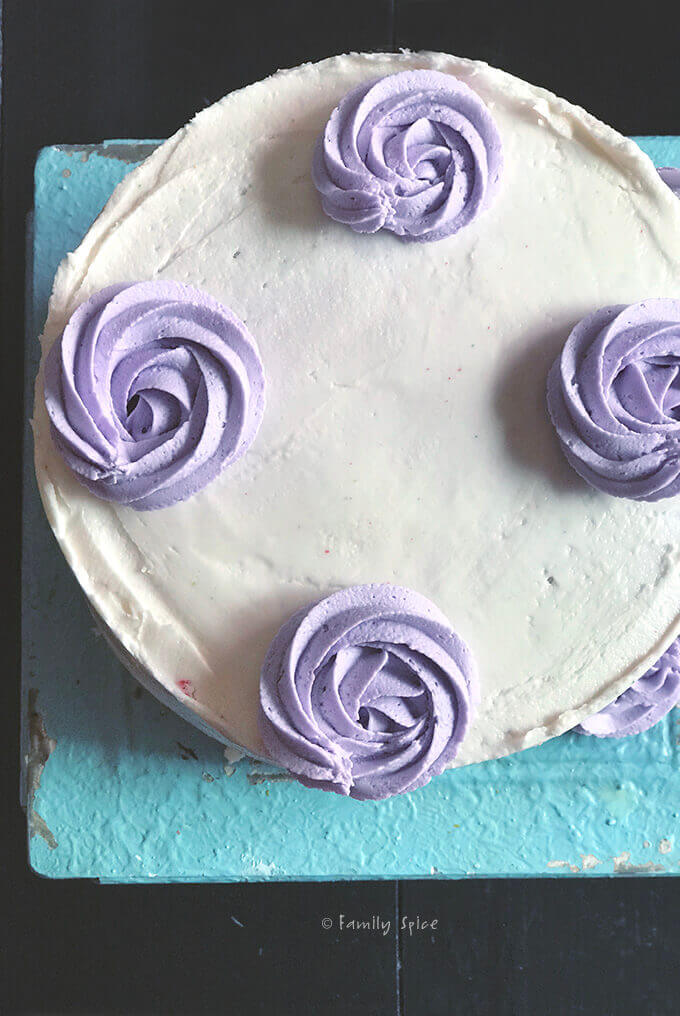
With the different tips used here, it is best to start forming the large rosettes first, then the medium ones, and finally fill in the holes with small rosettes of buttercream. We first decorated the entire top of the cake, then we moved on to the part that goes down the side.
Take your time at this stage of the cake. You are free to make more or less rosettes. Here we have completely covered the top of the cake.
We first trained the whole mane, only then we added the horn and the ears while melting.

Dress the unicorn's black eyes on the unicorn cake
We offer two methods here depending on how well you have mastered the piping bag.
Method 1 if you are not too comfortable
Melt black candies. Transfer the dough obtained in a small freezer bag, the corner of which you will cut a little to make a small pastry bag.
Draw eyes on paper and place on top of parchment paper as if it were tracing paper. Look up on the parchment paper following the patterns below. You can do more than one and choose the best ones afterwards.
Once dried and hardened, gently transfer them to the cake.
Method 2 - if you are comfortable
Look directly at the cake using a pastry bag and a # 4 nozzle.
Final touches on unicorn cake
In this step, we will add the horn and the ears, and finalize the decoration with small edible sprinkles. Use what you have, you can vary the sizes and shapes, just make sure the colors match the rest of the decor. Because unicorns are worth it, right?
Place the horn on top of the cake, in the center. Slightly tilt the horn towards the front of the unicorn cake. Gently place the ears melting on either side of the horn, tilting them slightly outward, so that they point in two opposite directions.
NOTE: If you don't have much room in your fridge, you will probably need to add the horn just before serving the unicorn cake.

Spread your unicorn mane on your unicorn cake
My daughter wanted her unicorn to be the same colors as Rosanna's unicorn, so I mixed 4 frosted colors: pink, purple, periwinkle and light blue. I also used similar frosting tips. I made more frosting than needed, but again, I wanted to make sure I didn't run out of frosting:
- 2 cups light pink buttercream frosting in decorative bags with tips # 824 and # 4B
- 1 cup blue buttercream frosting in a decorating bag fitted with a # 2A nozzle
- 2 cups light purple buttercream frosting in decorating bag with # 824 tip
- 1 cup periwinkle buttercream frosting in decorative bags with tips # 2A and # 4B

I had to examine dozens and dozens of decorated unicorn cakes to analyze the mane that cascaded down the side of the cake. I ended up improvising! I have included several photos of different angles of my unicorn cake so you can get a better idea of how I put it.

With the different sizes of pipe nipples you use, it's best to start with the large swirls first, then the medium ones, and fill in the empty spaces with the small pieces of frosting. I started with the top of the cake first, filled it and then worked my top on the side of the cake.
Take your time at this stage of the decorating process. You can add as many or as few swirls as you want. My daughter wanted a unicorn cake, so we had fun and went to get it.
Just to be clear, I ran the entire unicorn mane through the piping first, then added the unicorn horn and ears to the cake afterwards.

Hiss eyes of a black unicorn on your unicorn cake
Of all the parts on this unicorn cake, the part that worried me the most was the eyes. Yes, those simple slits in the eyes. Despite what you think, I'm not good at bagpipe cakes. Especially when it comes to piping the side of a cake.
How could I put these simple curves in the eye slits using black frosting and not smear my beautiful white cake without smearing it? I am not Rosanna Pansino. I settled for melted black candy that I had leftover Halloween. I transferred the black bib into a small resealable bag and cut a corner to make a small piping bag.
My daughter drew the eye slits on paper and we placed a sheet of parchment paper on it. She pulled out several slits for our eyes and we picked the best two for our cake. They were carefully transferred to the cake after it dried and hardened.
We also tried making eye slits with fondant, but found it to be a more tedious job. If you are comfortable with the pastry bag, then of course pipe a few black eyes directly onto the cake using a decorating bag fitted with a # 4 nozzle.
The finishing touch to your rainbow unicorn cake
As I mentioned earlier, I piped the unicorn's mane and hair through the piping before adding the horn and ears. I also had a bunch of gold, white, and pink glitter in different shapes because, well, I collect glitter of all kinds. When I showed them to my daughter, she loved the idea of adding them to the cake.
Because unicorns are the bling that counts, right?
I placed the fondant unicorn horn in the center of the top of the cake, tilted slightly towards the front of the cake. I gently placed the fondant ears on either side of the horn, each of them tilted slightly in opposite directions to each other.
NOTE: If you don't have much room in your fridge, you will probably need to add the unicorn horn right before serving the cake.
Unicorn cake recipe with rainbow layers
Brighten up anyone's birthday with this Rainbow 6 Layer Unicorn Cake Topper with Golden Melting Unicorn Horn and Unicorn Ears.
Preparation time : 8 hours
Cooking time: 1 hour
Rest time : 4 hours
Total time : 13 hours
Ingredients
- 2 boxes of white cake mix
- 2 1/2 cups of water *
- 2/3 cup vegetable oil *
- 6 egg whites *
- Assorted food colors
- 6 1/2 cups white buttercream frosting
- 1/2 lb white fondant
- 1/2 tsp. edible gold powder
- 1/8 c. XNUMX/XNUMX teaspoon peppermint extract
- 2 cups light pink buttercream frosting
- 1 cup blue buttercream frosting
- 2 cups light purple buttercream frosting
- 1 cup periwinkle buttercream frosting
- 1/4 cup black frosting or dark soft candy
- Assortment of sequins in gold, white or pink

Instructions
- Preheat the oven to 350ºF.
- Place the mixing bowl on the kitchen scale, then set to zero.
- Mix a can of white cake batter according to package directions in a mixing bowl.
- Weigh the bowl with the mixed and ready white cake batter. Divide this number by 3 and divide the dough into three bowls.
- Dye each bowl of cake batter in the desired colors. I used red, orange and yellow.
- Transfer the dough to 3 8-inch cake pans, covered with oil and lined with parchment paper.
- Bake cakes in the oven until a toothpick inserted in the center of the cake comes out clean, about 20 minutes. Let cakes cool completely on wire racks.
- While the cakes are baking, clean the bowls and prepare the second box of white cake batter according to package directions in the mixing bowl.
- Divide the dough evenly among three bowls and dye each dough in the desired color. I used green, blue and purple.
- Transfer the dough to 3 8-inch cake pans, covered with oil and lined with parchment paper.
- Bake cakes in the oven until a toothpick inserted in the center of the cake comes out clean, about 20 minutes. Let cakes cool completely on wire racks.
- Do not start frosting the cake until it has cooled completely.
- Stack cakes on a cake stand, layering them in white frosting between each layer.
- Frost and smooth the entire cake in white frosting. You will use about 6 cups of frosting.
- Put in the refrigerator to cool.
- Use white fondant to make a unicorn horn (detailed instructions in the blog post). Wrap it around a bamboo stick and let it harden.
- Roll out remaining fondant until 1/4 inch thick. Use the teardrop knives or template I provided (link in blog post) to cut out two ears with two inner ear pieces.
- Wet the back of the inner earpiece with water and place it on top of a larger earpiece. Place the ears facing down on a small rolling pin and let it harden. (detailed instructions in the blog post)
- Mix a few drops of peppermint extract into edible gold dust, then brush it onto the horn and paint the inner ear gold. Let dry completely.
- Pip rosettes on top and along one side of the cake using the pink and light purple frostings using nozzle # 824.
- Add a dollop of pink and dark purple frosting using tip # 4B and blue and dark purple frosting, each fitted with tip # 2A.
- Pip the eyes on the front center of the cake using black frosting and nozzle # 4.
- Place the horn on the top center of the cake and the ears on either side of the horn.
- Sprinkle around the cake with an assortment of gold, white and pink sprinkles.
- Refrigerate until ready to serve.